Hi I'm Qaiser Ijaz and I'm a contributing author to this blog, I've been developing Android Apps for last 4 to 5 years and I'm going to do a series of posts here each one of which is going to focus one Android component/topic starting from most basic level to much more advance topics. I hope you enjoy reading them.
So let's start with the 'Hello World' app which will familiarize you to the process of creating and deploying an Android application.
First of all you need to have Android Studio installed and setup properly, if you don't have Android Studio please follow this post.
1- Run Android Studio and select 'Start New Android Studio project'.
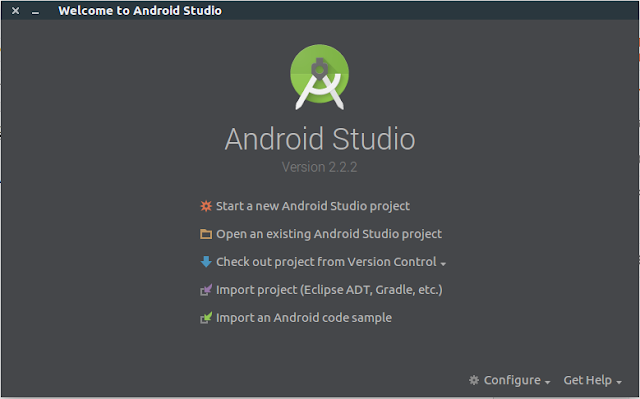
2- Doing so will bring up following screen.
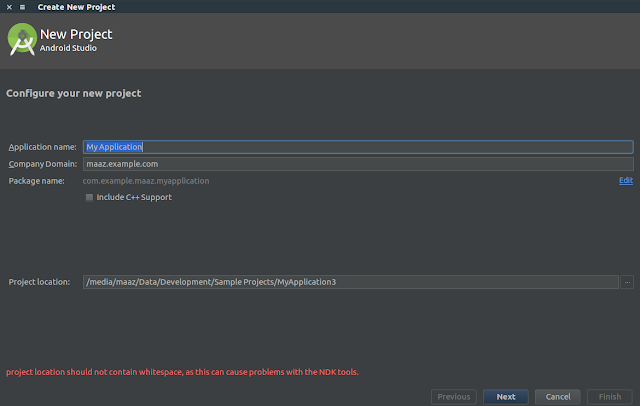
Leave everything else as it is for now and click 'Next'.
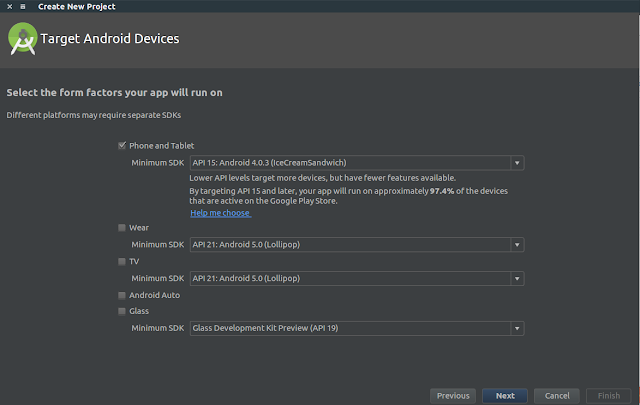
You'll be asked to select Target Android Devices, Android runs various kinds of devices but we are not going to create app for anything other than Android Phones/Tablets so select the first option if it's not selected already.
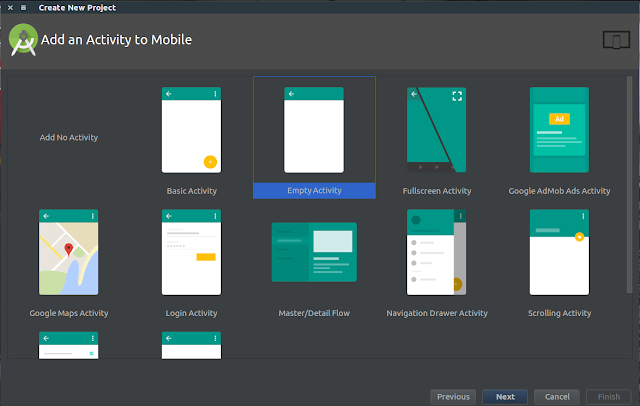
On next screen you are asked you 'Add an Activity to Mobile', Every single screen on an Android app is one activity so an Android app is essentially composed of many activities bundled together, what you see on above screen are 'templates' of different types of Activities which means selecting any of these template will automatically generate some code for you which is great but not so if you are in learning phase. Select 'Empty Activity' which is bare minimum that is required to display an empty screen on an Android device. Finally click 'Next'.
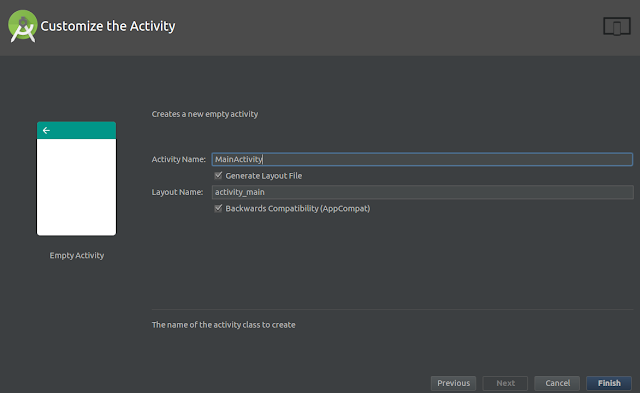
Next you are asked to enter name for your activity, type any name you want just be sure to start with a capital letter because a Java class with same name will be created for you and it is the standard practice to start Java class name with a capital.
Below that there is a checkbox 'Generate Layout File', let me explain this. In Android every screen you see is separated in two different languages, everything visible on screen is created using XML where as all the logic of application is written in Java. Although technically you could eliminate XML and write all your UI using pure Java but it's not the recommended practice, plus your code wouldn't be easy to read.
Having this separation of UI and application logic makes your life as a developer much easier because it makes your code easier to read/understand to you and to others and you can use the same 'layout' file in as many activities as you want.
So checking the ''Generate Layout File' essentially means that Android Studio will automatically create an XML layout file to displayed by your activity.
Hit 'Finish' and wait for Android Studio to create your project. When it finishes you'll be presented with the following screen.
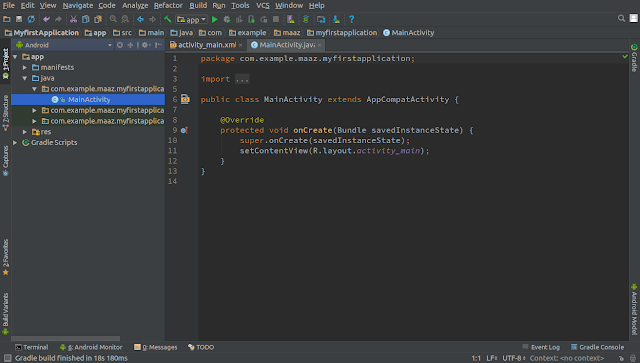
This is the Java file for MainActivity that we just created, don't worry if you don't understand the code in this file we'll go through each line one by one in later posts. For now just click the small green 'Play' button below the top menu bar.
Android Studio is going to ask you to select a device on which your app will execute.
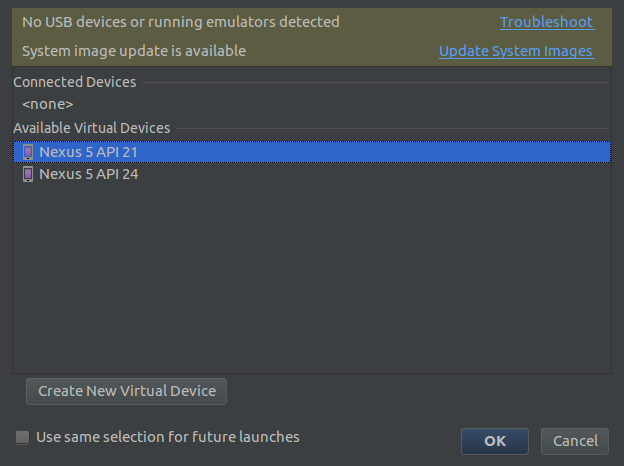
After that just connect your phone to your computer using the USB cable and Android Studio will display your phone as an option in above screen. select that and click 'OK'.
Android Studio will now compile your app, create an apk package, install it on selected device and launch your app. If everything goes ok you'll be presented with following screen on selected device.
So let's start with the 'Hello World' app which will familiarize you to the process of creating and deploying an Android application.
First of all you need to have Android Studio installed and setup properly, if you don't have Android Studio please follow this post.
1- Run Android Studio and select 'Start New Android Studio project'.

2- Doing so will bring up following screen.

Application Name:
This is the name of your app that will be displayed to the user, for this tutorial 'My Application' is just fine.Company Domain:
This is where you put your or your company's web site address. This is used to generate a unique Java package. Think of it as a unique identity of your application. All apps in Google Play Store are required to have a unique package name. For the purpose of this tutorial write whatever you like as it doesn't really matter because we are not going to publish this app.Leave everything else as it is for now and click 'Next'.

You'll be asked to select Target Android Devices, Android runs various kinds of devices but we are not going to create app for anything other than Android Phones/Tablets so select the first option if it's not selected already.
Minimum SDK:
With every new version of Android a new version of SDK (Software Development Kit) is released to Android developers. Selecting Minimum SDK version is important because it'll make sure your app runs on as many devices as possible. Android Studio gives you an estimate of how many devices your app will run on so select the Minimum version that Android Studio suggests and click 'Next'.
On next screen you are asked you 'Add an Activity to Mobile', Every single screen on an Android app is one activity so an Android app is essentially composed of many activities bundled together, what you see on above screen are 'templates' of different types of Activities which means selecting any of these template will automatically generate some code for you which is great but not so if you are in learning phase. Select 'Empty Activity' which is bare minimum that is required to display an empty screen on an Android device. Finally click 'Next'.

Next you are asked to enter name for your activity, type any name you want just be sure to start with a capital letter because a Java class with same name will be created for you and it is the standard practice to start Java class name with a capital.
Below that there is a checkbox 'Generate Layout File', let me explain this. In Android every screen you see is separated in two different languages, everything visible on screen is created using XML where as all the logic of application is written in Java. Although technically you could eliminate XML and write all your UI using pure Java but it's not the recommended practice, plus your code wouldn't be easy to read.
Having this separation of UI and application logic makes your life as a developer much easier because it makes your code easier to read/understand to you and to others and you can use the same 'layout' file in as many activities as you want.
So checking the ''Generate Layout File' essentially means that Android Studio will automatically create an XML layout file to displayed by your activity.
Hit 'Finish' and wait for Android Studio to create your project. When it finishes you'll be presented with the following screen.

This is the Java file for MainActivity that we just created, don't worry if you don't understand the code in this file we'll go through each line one by one in later posts. For now just click the small green 'Play' button below the top menu bar.
Android Studio is going to ask you to select a device on which your app will execute.

Physical Device:
If you have a physical Android phone, open Settings, go to 'Developer Options' and turn on 'USB Debugging', this step is required for Android Studio to recognize your phone.After that just connect your phone to your computer using the USB cable and Android Studio will display your phone as an option in above screen. select that and click 'OK'.
Virtual Device:
If you don't have an actual device you can use a virtual device, to setup an AVD (Android Virtual Device) please follow the instructions here. Once you have an AVD setup that will be presented as an option in above screen, select it and hit 'OK'Android Studio will now compile your app, create an apk package, install it on selected device and launch your app. If everything goes ok you'll be presented with following screen on selected device.
Congratulations! You have created your first app and successfully deployed it. It doesn't really do anything other than displaying a static text 'Hello world!' which we'll fix in the next post and add some controls/functionality so it doesn't look as boring as currently does.
If you have any problem please feel free to post in comments and I'll be glad to help.
Thank you for reading, stay tuned for more...
Related posts:

No comments:
Post a Comment